|
|
A primitive method using just a pocket knife
Eddie Jones' instrument had a resonator (he called it a loudspeaker) made from a paint bucket. These are hard to come by nowadays (you can still buy one at the hardware store), but the modern skid-row musician may find it easier to use the large metal cans available from restaurant trash bins. 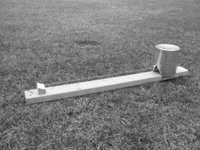 With a pocket knife, splits can be made in opposite sides of the can for the diddley bow string to pass through. This is most easily done by supporting the can with a board, placing the knife blade on the can where you want the cut and then hammering on the back of the blade with another board. This does not help the sharpness of your knife blade any, so I do not recommend trying this unless you really, really want to be sure you can do it. 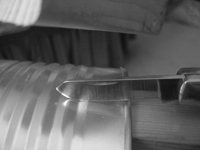 The split edges of the can may be bent into or out of the can to widen the splits so the
string can pass through freely. No matter which way you do it, it will likely not look pretty—for the record, I bent
my edges into the can.
 The can may then be mounted on the board by using a nail to make holes in the side near the rim. After the can is placed upside down on the board, a short piece of wire is passed through the holes and under the board and tightened. 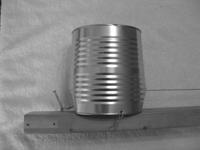 A more modern method with hand tools
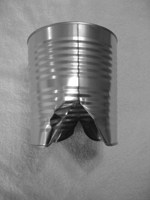
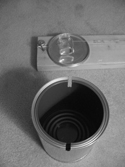
For my first replica, I made the resonator from an empty metal paint can bought at the hardware store. The lid of the paint can rests upside-down on the board, under the string, and the can itself will rest upside down and press-fit onto the lid. A slot is cut and filed in either side of the can to allow the string to pass through the can . The string should have about 3/16" clearance on each side and at the top. 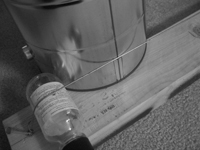 I started construction by removing the bail (wire handle) from the paint can, and marked positions on the lip of the can 90 degrees from the attachment points of the bail. I then placed the can upside down on the board beside the string and mark how deep the slot must be to pass the string. I marked the slots on the lip and sides of the can (about 3/8" wide) and used a hacksaw and metal files to cut and clean up the slots. I made sure I supported the metal as I cut through the rim of the can. 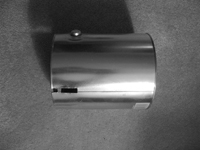 Then I test-fit the can on the assembled diddley bow (still without the lid). 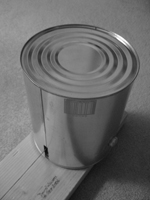 Now let's turn to the lid. Some cans have the center portion of the lid approximately flush with the edge of the lid, while others have the center of the lid depressed with respect to the edge. If the center is depressed, the center portion of the lid can be fitted with a thin disk of masonite or plywood to support the glass jar bridge. 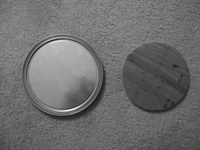 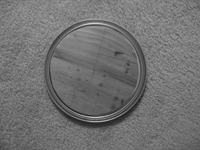 If up to now, there has been no problem with the bottle sliding away from the 10 penny
nail, simply center the lid upside down under the string as close to the nail as possible, slide the bottle bridge in place,
and tension up the string with the wooden nut. Then place the can on the lid with the string going through
the slots without touching the can, and tap the can home with the heel of your hand. Do not use a mallet
or hammer, as this tends to deform the lid, creating unwanted buzzes. If, on the other hand, the bottle
tends to slide away from the nail, it may be necessary to screw the lid in place and install detents as described in the troubleshooting
section above.
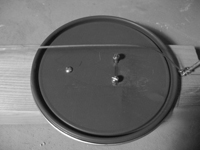
 I drew a center line on the underside of the lid (the side that will be facing
up). I took the wood nut and jar out from under the wire, placed the paint can lid (with plywood support)
under the wire against the nail. I then slipped the jar and wood block back into place, and marked a spot
on the lid centerline that not covered by the jar. I removed the jar, and keeping the centerline on the
lid lined up with the centerline on the board, I drilled a hole for a screw to hold the lid in place. I
installed the screw hand tight, and (as for the basic diddley bow) I then test-fit the jar and wood nut again to find the
position of the bottle that gives the maximum tension, and marked this position on the lid. I then marked
a line perpendicular to the center line about ¼" to 3/8" further from the nail, and drilled two holes on
this line about ½" on each side of the center line. I screwed two round-head wood screws (again,
using 1-1/2" #8 screws) through the lid, plywood support and into the board, leaving the screws standing about 1/8"
proud of the lid.
 As in the case of the basic diddley bow, these will act as detents to prevent the bottle
from moving way from the end nail. I then slipped the bottle under the string and over the protruding screws
to be positioned between the 10 penny nail and the screws—if the bottle couldn't make it, I screwed in the wood
screws a bit more. I then test-fit the can by press-fitting in onto the upside down paint can lid.
|